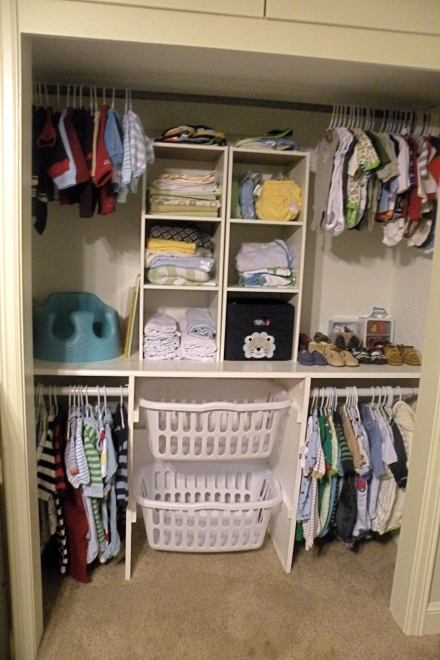
Baby Closet: How to

We’ve had a lot of interest in the baby closet with several friends asking how we did it.  So by popular demand, here it is!

The best part about this closet is that it is really incredibly easy.  We did this long before I had used Erin’s Pinterest Project wish-list as an excuse to build up my wood shop (Thank you, Pinterest).  The entire process is as simple as cutting a few pieces of wood and screwing them together.

Here’s what you’ll need:

  • Drill with screwdriver bit
  • 1 x 2 lumber
  • 1/2″ plywood
  • 1×8 poplar
  • 1 5/8″ wood screws
  • 2 small laundry baskets
  • 2 Closet Maid 3 Cube Stackable Organizers (These can be found at Target)
  • Closet Rods
  • Circular Saw or Jig Saw (You don’t have to cut the boards yourself if you don’t have access to a powered saw.  You can have the people at the lumber yard where you buy your material cut everything to size.  Just give them the cut list and they will take care of this part)
  • Although you don’t have to have one; you can also use a Kregg pocket hole jig which can be found at any major hardware store.  They go for around $50 and are great for this project as well as any other where you don’t want the screws to be seen.  I would definitely recommend this investment.

IMG_0697

Step 1:

Decide how high you will need and/or want the main shelf to be.  This will need to be tall enough to fit the racks for your laundry baskets below.  Measure the width and depth of the closet.  (As a reference, our closet was 5 feet wide by 3 feet deep and we set our main shelf 3 feet high.)

Step 2:

Get one piece of !/2″ plywood cut to fit the width and depth of the closet and act as your main shelf.  Have 2 pieces of the same plywood cut to match the depth of your main shelf and tall enough to fit squarely below the main shelf and hold your laundry baskets.

Have 4 pieces of the 1×2 lumber cut to match the depth of the main shelf and act as your cleats for your laundry baskets, 1 piece of 1×2 to be 2 inches shorter than the width of the closet.  Have 1 piece of 1×8 poplar cut to match the width of the laundry basket rack and 2 pieces of 1×8 cut to match your closet depth.

Step 3:

Attach the 1×8 poplar boards along the side walls of the closet by screwing them to the wall studs.  Also attach the 1×2 popular you had cut 2 inches shorter than the closet width along the back so that the tops of all of the cleats are even and level.

Step 4: 

Attach the 1/2″ plywood you cut for your main shelf on top of these cleats with wood screws.

Step 5: 

Now if you have the Kregg Pocket Hole Jig, use it to drill 2 pocket holes on each end of the 1×8 Popular you had cut to the width of your basket rack.  (If you don’t have the jig, you can just screw through sides to attach this board.

Also, drill 4 to 5 pocket holes along the top edge of the plywood you had cut to act as the sides of your basket rack.

Step 6:

Attach the 1×2’s to the sides of your basket rack to that you have enough space from top to bottom to allow for both laundry baskets.

Step 7:

Attach the 1×8 popular along the back side of the basket racks and attach the walls of the basket racks to the underside of the main shelf.  The 1×8 board acts as a stiffener to hold the sides of your basket racks together.

DSCN1415

Step 8:

Install your closet rods from the side of the basket racks to the 1×8 poplar cleats on the sides of your closet. (This is why you will want to have 1×8’s as the side cleats instead of just 1×2’s.  1×8’s give you more space to mount your closet rods.

Closet-3

Step 9:

Paint the shelves to the color of your choice.  We chose white to match the 2 Closet Maid Stackable Shelves we used.

And that’s all there is to it.  If you get the wood pre-cut at your local Lowes or Home Depot, you can do this little project in one easy afternoon.  The best part about using the Closet maid shelves is that you can move them around to fit your needs and as the baby changes and grows, this becomes very handy.

DSCN1416

Closet-4

A few tips:

Make sure your closet is square and the width/depth is even all around.  When we first cut our plywood main shelf, we didn’t know the closet wasn’t exactly square so one corner was slightly shorter than the rest.  Because of this we had to cut the main shelf a couple of times to get the right fit.  If it’s not square, no problem, just cut the main shelf to fit the smaller measurement.  It’s better to cut the main shelf a !/2″ short on the width to allow for some wiggle room.  You can always caulk the gaps around the edges after you have it installed.

When you measure the widths of your laundry baskets, allow for the basket rack to be a about 1/4″ wider so the baskets will slide in and out easily.

I hope that helps all of you out there who are either expecting a little one or just want to make their closet a little bit more kid friendly.  If you have any questions, feel free to ask.

New Use for an Old Window

I bought this old window when I was still pregnant.  Carey and I found it at an antique show for just $10.  Score!  I was so excited and had big plans to up-cycle it as soon as we got Gray’s newborn photos.  After he arrived, I realized that taking and shower and brushing my teeth would become luxuries during my day.  The first 10 weeks of his life are somewhat of a blur now.  Thank goodness I have these sweet pictures (by Julie Dawkins Photography) to help me remember just how sweet and precious he was during those foggy-brain days.  We took his 4 month pictures yesterday and I can’t wait to see how they turn out.  I’m on the lookout for another old window to repurpose.

This is what it looked like when we brought it home.  It was pretty dirty and chipped.

Carey pulled that metal piece out with pliers. The, I sanded it down and taped around the edge of the glass.

I added a quick coat of off-white paint we had from a different project.

Carey added some photo hooks to the back and we mounted it on the wall.

All so we can stare at this cute face every time we come into our bedroom.  Gotta love those pouty lips and skinny legs.

Pinterest Challenge Chalkboard

I don’t know if you’ve been bitten by the Pinterest bug yet, but I definitely have the fever. Pinterest is a website where you can “pin” items you see on the world-wide-web that tickle your fancy.  There are so many inspirational ideas…and so many creative people out there.

Over on YHL last week, I saw that they were hosting a Pinterest Challenge with a few other bloggers.  I stuck that idea in the back of my head, but didn’t think much more about it until Monday afternoon.  Procrastination is one of my weaknesses.  I sent Carey a quick text asking if we were going to participate.  We had talked earlier that weekend about making one of these great Laundry Basket Dressers, so he went on a search for some plywood.  The only thing he could find in our price range (free) were these old carpet displays.  As soon as I saw them, I changed our evening DIY project immediately.  There was no way I was going to let him tear these babies apart!

Original Carpet Display Box

After stacking one box on top of another to avoid getting it stuck to the handy drop cloth, I applied a quick coat of white paint that we had left over from our closet reorganization project.  After that, I added a few coats of chalkboard paint to the interior.  Next, I used super glue to attach a drawer pull (upside down so that it could hold the chalk – see inspiration photo on Pinterest here).

Carey drilled in some drawer pulls to hang my aprons and the project was finished.  In all, it took about 2 hours and a little under $20 to complete.  Now, we have a great place to write messages to each other and hang some of my aprons.

Divine Organization


They say in the beginning, “God created Heaven and the Earth”.  And after that, he and Ms. God spent the weekend organizing all of the clutter in their closets (They left that part out in the book).  Well we’re no God’s, but we are trying to create our own little heaven here on Earth, i.e. buying a new house and preparing for a new baby.  Can’t Wait!  And like God, we had a little bit of clutter in our closet.

Since we are not Mr. and Ms. God, we couldn’t just snap our fingers to make this mess reorganize itself.  But we did figure out a simple and easy way to make it a little more presentable.  Step 1: Get all the junk out.  Once that is done, a trip to the local hardware store will put you on the righteous path.  We decided on some of the inexpensive wire shelving in white, (the heavenly color of neat and clean).  You can have it cut to size at the store or just cut it yourself.

Safety first, then teamwork.

Once you’ve got it cut to fit, you can hang it.  Our closet didn’t have a lot of great light so I had to pull out my official members only Chilean Miners Head Lamp!

Let there be LIGHT!

Now that mine eyes can see the glory, Ill give you a little tip. Typically, you would hang these wire shelves with the little plastic hook sets that are sold in the same section.  These are great if you are planning on only setting nice fluffy angels wings on them because they won’t hold much else.  So for more support, get a few pieces of 1×2 lumber and cut out some supports to run along the wall.  This not only makes the shelves stronger, it also makes them easier to level since you can just draw a line with a level, tack the 1×2 alone the line and set the shelves on top.

Patch any holes with sheetrock mud followed by a fresh coat of white paint and even Jesus wouldn’t mind stashing his birkenstocks here!

Cleanliness truly is next to Godliness!  Now peace can truly be with you, and also with you.


The Big, Hairy List

When we decided to buy this house, one of the selling factors was that it didn’t have a lot of work that needed to be done.  Our last house was built in 1939, and we had to complete lots of upgrades in the five years that we lived there.  This house, on the other hand, had been newly remodeled.  Of course, there were some minor fix-ups we knew we would have to do upon moving in, like hanging towel rods and toilet paper holders.  Those we done within the first week of moving in…and we soon became restless.

I think that The Farmhouse Table Affair sparked an inner desire to decorate and fix up even more things around the house.  Carey can’t even go into other people’s houses without looking for the things he could fix (sorry, friends).  Our once small fix-it-list has now turned into The Big, Hairy List of to-dos.  Some are minor; some are major.  We are doing our best to document them.  It will be fun to look back someday at our house before/after pics.  I’m sure we’ll have some “What were we thinking?” moments.  For now, we are hoping to avoid fads (like fruit border in the kitchen, circa 1994) and use timeless neutrals with splashes of color.  I change my mind often, so neutrals will provide a solid background for my latest whim.

The Big, Hairy List (as of June 27, 2011)

Over the weekend, I put my Handyman (handy-woman?) skills to work and hung some artwork in my bathroom.  It had been sitting on the floor of the bathroom for over two months!  Procrastination is one of my top skills.  Plus, when you have old episodes of Dirt to watch, it is hard to get anything done.  It is great to find shows that you love…then learn that they were canceled during the writer’s strike.  Oh, well.  I guess that leaves more time for home improvements.  Here are the before and after photos of the hall bathroom.

Before

After

Who knows what tomorrow will bring?  So much excitement, I’m not sure I’ll be able to sleep tonight.