Chewy Sugar Cookies

Happy How To’s Day! Today’s How To is about baking…my favorite subject. In another life, I must’ve owned a bakery. I served fresh bread and cookies to people looking to retreat from the hustle and bustle of life. When you’re eating baked goods, it is really hard to worry about anything (except maybe fitting into your pants the next day).

These cookies are a little sweet, a little salty, and a lot delicious. I made a double batch last time just so I could eat eight a few of them myself. I found this recipe on Pinterest as I was planning Gray’s first birthday party and I’ve made them several times since then. They’ve been a hit every time.

cookies-6-Edita

Chewy Sugar Cookies
2 cups cake flour
2/3 all-purpose flour
3/4 teaspoon baking soda
1 teaspoon salt
1 cup (2 sticks) unsalted butter, 1 stick at room temperature, 1 stick melted and slightly cooled
1 1/4 cup granulated sugar
2 teaspoons vanilla extract
1 egg + 1 egg yolk
1/2 turbinado sugar (decoration)

  1. Pre-heat oven to 375 F. Line two baking sheets with parchment paper.
  2. In a medium bowl, whisk together both flours, the baking soda and the salt.
  3. In the bowl of a stand mixer fitted with the paddle attachment, beat the butter and granulated sugar on medium speed until light and fluffy, about 4-5 minutes.
  4. Mix in the vanilla, egg and egg yolk until completely incorporated.
  5. With the mixer on low, add the dry ingredients in two batches, beating just until the dough comes together.
  6. Using a small cookie scoop, scoop each cookie into your hand, dip the top into the turbinado sugar, then place on the prepared baking sheets about 2 inches apart. You can use a large cookie scoop for bigger cookies – just increase the baking time by 1-2 minutes.
  7. Bake (one sheet at a time) for about 10 minutes, or until the edges of the cookies are set and light golden brown. I always under-bake my cookies a bit because I can’t stand crispy cookies.
  8. Transfer the baking sheet to a wire rack and let the cookies cool for 5 minutes then remove the cookies to the wire rack to cool completely. Repeat with all of the dough, alternating baking sheets.

Recipe adapted from Tracey’s Culinary Adventures.

Mom’s Cherry Crumb Cake

This simple dessert is the cure for plain vanilla ice cream.  Unless, of course, you happen to like plain vanilla ice cream.  Then, it just makes your ice cream irresistible.  With just a few simple ingredients, you can make a crumb cake that will please a crowd.  This recipe calls for a can of crushed pineapple, but I only had fresh pineapple at home, so feel free to substitute if needed.

Mom’s Cherry Crumb Cake (Serves 8-10)

You will need:

  • 1 box Jiffy Yellow Cake Mix
  • 2 Cans Cherry Pie Filling
  • 1 Can Crushed Pineapple
  • 1 Stick Butter
Directions:
  1. Preheat oven to 350° and lightly grease a 13×9 pan.
  2. Pour the cherry pie filling directly into the prepared pan.
  3. Add the pineapple and stir together with the cherries.
  4. Even the filling out over the pan.
  5. Dump the cake mix on top of the filing and spread evenly.
  6. Cut the butter into small slices and lay it out evenly over the cake mix.
  7. Bake at 350° on center rack for 30-40 minutes or until the cake mix starts to brown.
  8. Remove from oven and cool for 15-20 minutes.
  9. Serve with vanilla ice cream or whipped cream.

Marble Cheesecake Bars

In honor of National Cheesecake Day, I made these Marble Cheesecake Bars.  Not that I really need an excuse to bake.  Making an entire cheesecake just sounded like too much work, so this easy version satisfied the cheesecake craving in just a portion of the time.

Marble Cheesecake Bars

You will need:

  • 1 box chocolate cake mix
  • 1/3 cup unsalted butter, softened
  • 1 egg
  • 8 ounces cream cheese, softened
  • 1 cup powdered sugar
  • 2 tablespoons strong coffee
  • 2 eggs
  • 1 teaspoon vanilla
  • 2 ounces semi-sweet chocolate chips or bar

Directions:

  1. Preheat the oven to 350°
  2. Combine cake mix, 1/3 cup butter and egg in a medium sized bowl.  Beat on medium speed until well blended.
  3. Press the cake mixture into the bottom of an ungreased 9×13 pan.
  4. In another bowl, beat the cream cheese until smooth.
  5. Gradually add the powered sugar and combine.
  6. Blend in the 2 eggs, vanilla, and coffee.
  7. Pour the cream cheese mixture over the cake mixture and even out with a spatula.
  8. In a small, microwave safe bowl, melt the chocolate chips or bar.
  9. Drop small spoonfuls over the cream cheese mixture.  Drag a butter knife through the drops to create the marble effect.
  10. Bake on center rack for 25 minutes.
  11. Cool completely and refrigerate for 1-2 hours or until firm.

Lime Cookies with Cream Cheese Frosting

Some pregnant women crave pickles and ice cream.  I can’t get enough citrus.  Lately, I’ve been making homemade lemonade and garlic lime chicken on a weekly basis.  After visiting Lauren’s house today and tasting these Glazed Lemon Cookies from Two Peas and Their Pod, I knew I had to try my own version.  I had some cream cheese and limes in the refrigerator, so I decided to go with that combination and Lime Cookies with Cream Cheese Frosting were born.  Let’s hope that Grayson’s birthday is just as easy!

Lime Cookies with Cream Cheese Frosting (Makes 2 Dozen)

You will need:

  • 2 1/4 cups all-purpose flour
  • 1/2 tsp baking powder
  • 1/2 tsp kosher salt
  • 3/4 cup granulated sugar
  • 2 tbsp lime zest (1 large lime)
  • 2 sticks unsalted butter, room temperature
  • 1 egg
  • 1 tsp vanilla
  • 1 cup powdered sugar
  • 1 tbsp lime juice
  • 4 oz. cream cheese, softened

Directions:

  1. Preheat the oven to 350° and line two baking sheets with parchment paper or a silicone baking mat.  Set aside.  Note: If you do not have parchment paper or a silicone baking mat, place the dough directly on an ungreased cookie sheet.
  2. In a medium bowl, combine flour, baking powder and salt.
  3. In a small bowl, combine granulated sugar and lime zest.  Rub the sugar and zest together with your hands to combine.
  4. Beat butter and sugar/zest mixture until light and fluffy.
  5. Beat in egg and vanilla until well combined.
  6. Slowly beat in the flour mixture on low speed until blended.  Dough will be thick.
  7. Drop dough by rounded tablespoons onto baking sheets, spacing 2 inches apart. Gently flatten dough with the palm of your hand.  Note: I will make these cookies bigger next time.  I won’t get as many, but they will be a little softer in the middle.
  8. Bake for 11-13 minutes or until cookies are just set.  Cool cookies on baking sheet for 2-3 minutes before transferring to wire racks.  Cool completely.
  9. To make the frosting, add the cream cheese and powdered sugar to a medium bowl and beat until smooth.  Add the lime juice and combine well.
  10. When cookies are cool, use a knife to ice.
  11. Let icing dry before packaging.  You will want to share!
Source: Slightly adapted from Two Peas and Their Pod

Thai Stir-Fry

I love eating at the Chinese or Japanese restaurants in mall food courts.  I also love that they are usually the exact same foods at each place…I just choose the one with the shortest line.  This recipe was inspired by a craving for some of that mall food.  My guess that it is much healthier when cooked at home, which is always a bonus.

Thai Stir-Fry

Thai Stir-Fry (Serves 4)

You will need:

  • 2 chicken breasts, thawed and cut into 1-inch chunks
  • 2 Tbsp Olive Oil
  • 1 Whole Red Onion, Sliced into thin strips
  • 2 Whole Red Peppers, Sliced into thin strips
  • 1 Cup Pineapple Chunks, Fresh or Canned
  • 1/2 Cup Thai Sweet Chili Sauce
  • 1 Bunch Lo Mein Noodles

Directions:

  1. Cook Lo mein noodles according to package directions.  Rinse with cold water and set aside.
  2. Heat one tablespoon olive oil over medium high heat in skillet or wok.
  3. Add the chicken to hot olive oil and cook until no longer pink in the middle.
  4. Remove the chicken from the skillet or wok and set aside.
  5. Heat the remaining olive oil in the skillet or wok.
  6. Stir-fry onion and red pepper slices for 2-4 minutes, stirring constantly so they don’t burn.
  7. Reduce heat to medium low and add pineapple chunks and Thai Sweet Chili Sauce.
  8. Stir for 2 minutes before adding the grilled chicken and Lo mein noodles.  Stir to coat with sauce.
  9. Remove from heat and serve.

Burrito Bowls

Need a quick and easy dinner?  This is just about as quick and easy as it gets.  We found that we were spending every Friday night at a restaurant that shall remain nameless.  Hint: it starts with a “Ch” and ends with an “ipotle.”  I can’t resist their chips and guac!

Unfortunately, it was eating into our monthly budget more than we wanted it to, so I had to come up with an alternative so that I could still get one of my favorite meals at least once a week.  This meal is so quick and cheap that I have made it more than once a week recently. Sorry, hubby!  I have to live without the chips and guac when I make it at home, but that is better for me anyway.  Maybe I’ll make PW’s Grilled Corn Guacamole soon to compliment this meal.

The toppings on the list below are just suggestions.  If you have favorite items that you put on your burritos at home, switch them out to your heart’s content.  No one will judge you…

Burrito Bowls

Burrito Bowls

You will need:

  • 4 chicken breasts, thawed
  • Rice (I use Southwest Instant Rice)
  • Black Beans
  • Pico de Gallo
  • Shredded Cheese
  • Sour Cream

Directions:

  1. Grill the chicken with your favorite seasonings and slice into thin strips.
  2. Cook the rice and beans.
  3. Place rice, beans, and chicken in bowls.
  4. Layer with additional toppings and serve.

Naan Pizza

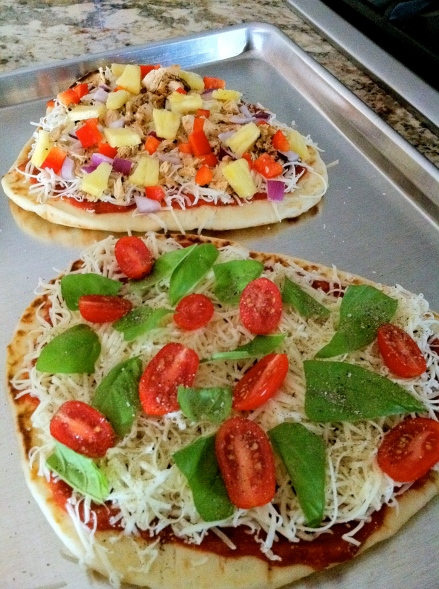
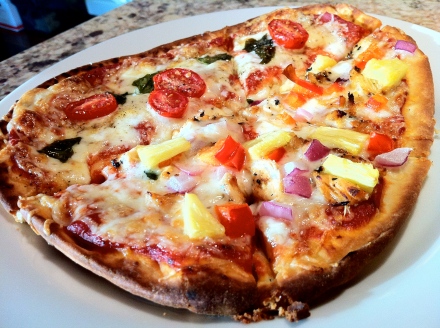
Finding quick dinner ideas (that I will eat) is sometimes difficult.  I have gotten pretty good at creating meals on short notice…mostly because I am a finicky eater and change my mind about food frequently.  I’m not even sure how this dish was discovered, but it has definitely been added to Velez Family Menu. We discovered Naan on a trip to an Indian restaurant with LaurenO.  Naan is traditional Indian flat-bread.  I didn’t think I would like Indian food, but I am now hooked on Chicken Tika Masala.  Yum!  After finding Naan in the grocery deli section at Reasor’s, I soon started finding other uses for it.  That’s how Naan Pizza was introduced into our weeknight selection of meals.  The great thing about this recipe is that you can add your favorite toppings.  Don’t like olives?  Leave them off.  Want extra pineapple?  Go for it!  You can be as creative or dull as your heart desires…all in a matter of about 30 minutes, start to finish.

Margarita Pizza and Chicken/Pineapple Pizza

Half and Half of Each Pizza

Naan Pizza

You will need:

  • Naan (one piece for each person)
  • Olive Oil
  • Toppings (Suggestions: Pizza Sauce, Cheese, Tomatoes, Basil, etc.)
Directions:
  1. Heat oven to 400°.
  2. Place Naan on cookie sheet and brush lightly with olive oil.
  3. Add toppings.
  4. Place on center rack and bake for 15 minutes.
  5. Remove from oven and let cool for 2-3 minutes before cutting and serving.

Sweet and Spicy Grilled Chicken

We have been eating lots of BBQ this summer.  Most of our grilling happens inside because it is 3000° outside in Oklahoma right now, so this recipe gets us a quick fix but doesn’t force us to stand outside in the heat.  We are wimps when it comes to this kind of heat.  If our A/C ever goes out, we’ll be in big trouble.  But…this Sweet & Spicy Grilled Chicken has just the right amount of heat.  It goes great on little slider sandwiches, but it is just as good on its own.  We used chicken breast tenderloins, but they can easily be substituted for full size chicken breasts.

Sweet & Spicy Grilled Chicken

Sweet & Spicy Grilled Chicken

For the Marinade:

  • 6 Chicken Breast Tenderloins or 4 Chicken Breasts, thawed
  • Juice of 1 Lime
  • 1 Tablespoon Garlic
  • 1 Teaspoon Sea Salt
  • 1/2 Teaspoon Pepper

For the Glaze:

  • 1/3 Cup Honey or Agave Nectar
  • Juice of 1 Lime
  • 1 Tablespoon Sriracha or Hot Sauce
Directions:
  1. For the marinade, combine the lime juice, garlic, salt and pepper.  Pour into a gallon size Ziploc bag and add the chicken.  Shake to coat and place in the refrigerator for 1-2 hours.
  2. Remove chicken from marinade and grill over medium heat until center is no longer pink.
  3. While the chicken is cooking, mix together all of the ingredients for the glaze in a small bowl.
  4. Turn the heat to low and baste each side with glaze.
  5. Serve on toasted rolls or as a stand-alone dish.

Source: Slightly adapted from Weber’s Way to Grill.

Oven Grilled Corn-on-the-Cob

It is How To’s Day over at the Lettered Cottage, so I thought I’d share one of my new favorite recipes.  Corn-on-the-cob is the quintessential summer side dish, and this recipe is super delicious and super easy.  It is so hot here in Oklahoma that we don’t want to go outside for any reason at all, including grilling.  This corn is grilled right in your oven, in the comfort of your air-conditioned house. I think I’m ready for fall weather (and it isn’t even July yet)!

Oven Grilled Corn-on-the-Cob

Oven Grilled Corn-on-the-Cob

Ingredients:

  • 4-6 ears of corn – shucks on
  • Butter
  • Lemon Pepper (or favorite seasoning)
Directions:
  1. Preheat oven to 350° F
  2. Cut off the fibers that are hanging out of the end of each ear of corn.
  3. Place corn directly on center rack.
  4. Bake for 30 minutes; remove to wire racks or foil sheet to cool for 2-3 minutes.
  5. Peel down shucks (do not remove – this will be your handle) and remove the remaining fibers.
  6. Coat with butter and sprinkle with your favorite seasoning (lemon pepper is quite delicious).
The Lettered Cottage

Chocolate Chip Cookie Craving

I’ve learned over the last five months of being pregnant that once I get an idea of what I want to eat, it isn’t going away.  Today, someone at work said, “A warm chocolate chip cookie sounds really good right now.”  Guess what?  I happen to believe that a warm chocolate chip cookie sounds good anytime.  So…the thought was stuck in my head and I stopped by the grocery store on my way home from work to grab the missing ingredients.  This is my favorite chocolate chip cookie recipe.  On the next cloudy day, make these and sit on the couch to watch your favorite movie.  You won’t regret it (until you get on the scale the next morning).

Chocolate Chip Cookies

Ingredients:

  • 1 2/3 cups all-purpose flour
  • 3/4 teaspoon baking powder
  • 1/2 teaspoon baking soda
  • 1/2 teaspoon salt
  • 1/2 cup butter (1 stick), softened
  • 1/4 cup shortening (butter flavored is best), softened
  • 3/4 cup packed brown sugar
  • 1/3 cup granulated sugar
  • 3 teaspoons vanilla extract
  • 1 large egg
  • 1 3/4 cups (11.5 ounce package) chocolate chunks
Directions:
  1. Preheat oven to 375 F
  2. Combine flour, baking powder, baking soda, and salt in a small bowl.  Set aside.  In another bowl, beat butter, brown sugar, granulated sugar, shortening, and vanilla extract until creamy.  Beat in egg.  Gradually beat in flour mixture.  Stir in chocolate chips.  Drop by slightly rounded tablespoons onto an ungreased cookie sheet.
  3. Bake for 8-11 minutes or until edges are lightly browned (I like mine to be slightly undercooked).  Cook on baking sheets for 2 minutes; remove to wire racks or foil sheet to cool completely.
Source: Slightly adapted from The Cookie Bible, 2004